Two years ago I wrote about my SRAM Automatix hub bicycle. I've owned a lot of bikes, but this particular bike has a special place in my heart. It's the bike I've had the most fun riding, and the one I have the strongest emotional attachment to. Unfortunately, for nearly two years the bike hasn't been in riding condition. I recently made some upgrades, and brought it back to better-than-new condition. This post is going to be the story of what happened to the bike, and the recent work I did on the bike.
But before the boring exposition, let's take a look at the bike now, in its restored form:

The Backstory
In October of 2015---only a month after I wrote the last post about this bike---I was riding when I got in a pretty serious bike accident. That bike accident is a story in and of itself, which I'll save for another day. While I was recovering, I took some time to prepare an upgrade I had been wanting to make to the bike. Factory 5 had just come out with their new Lattice Chainring, and I wanted to install one on my bike. There were two motivations behind this change. First and foremost, I thought the Lattice Chainring was beautiful, and I thought it would make a great cosmetic upgrade to the bike. The second reason was that I wanted a longer gear ratio, which I could achieve by installing a new front chainring with more teeth.
I put in an order, choosing a 48T chainring/crankset to replace the existing 46T Sugino Messenger chainring/crankset. When everything came, I started taking apart the bike. Changing out the chainring/crankset goes like this:
- Remove the old pedals from the old cranks
- Remove the old crankset
- Install the new crankset
- Install the old pedals onto the new cranks
I got stuck on step one. I had put pretty nice Shimano Deore XT SPD pedals on the original bike, which I wanted to keep. But when I tried to remove them, the pedals were stuck, and I couldn't get them off the cranks. Pedals and cranks on bikes work a bit differently from what you might expect. The right pedal on a bike is right-hand threaded (or "regular" threaded), which is what most people are used to. But the left pedal on a bike is not: it's left-hand threaded (or "reverse" threaded). This is done so the pedals are self-tightening, meaning that riding a bike will actually cause the pedals to screw themselves in even tighter. If a bike is ridden a lot, this can cause the pedals to become overtightened (especially if the pedals weren't properly lubricated when initially installed). This is exactly what happened with my bike. Standard pedals can be removed with a pedal wrench, which is just a 15 mm wrench with an extremely long handle. The extra long handle gives you extra mechanical advantage when removing the pedals, which is necessary when the pedals are overtightened. Unfortunately, SPD pedals don't work this way---they're fastened with an 8 mm hex bolt, meaning you have to use a hex key that fits into the socket at the end of the bolt (rather than a wrench that grips around the outside of the pedal). I bought a special 8 mm hex key with a long handle, which is as close a pedal wrench as you can get in this circumstance.
But one of the injuries I had sustained in my bike accident was a scaphoid fracture. In non-medical terms: I broke my right wrist. This required surgery, and a titanium screw was permanently put in my wrist. This severely limited my ability to do any hard wrenching. Applying a lot of force on the wrench caused extreme pain through my hand and forearm. So the project got put on hold for a while, with the wheels removed but the pedals intact.
It took about a year for my wrist to heal, and during the recovery period biking had lost some of its appeal. Even after the initial healing period, I was worried that if another bike accident sent me over the handlebars I could re-break my wrist. I started mostly commuting by public transit, and when I did bike I used my road bike. At the end of 2016 I bought a motorcycle, and that further distracted me from my bicycles.
The Resurrection
In July of this year I quit my job, which has given me a lot of time to work on a lot of fun personal projects. Recently I got around to my bike projects, and I decided to make resurrecting the Automatix build the first of these projects.
Even with a healed wrist, I was actually only able to get one of the pedals off. I have a bike stand in my apartment, but it's not great for wrenching that requires a lot of force, since too much force can push the stand over. A mechanic at my local bike shop, Valencia Cyclery, kindly offered to help me get the pedal off. It took him about a minute using a real bike stand and an even longer wrench. The guys at Valencia Cyclery are really awesome---they did this for me for free, and I've always had really good interactions with them. If you're in the neighborhood I recommend checking them out.
After removing the pedals, the rest of the installation was pretty easy. New to me was removing the cranks from a bike. I've previously built a bike from parts, which requires installing cranks. That's pretty easy: you just use a standard hex wrench to put the cranks on. Removing cranks is a different story, and requires using a really simple (but strange) tool called a crank puller. Sheldown Brown has a great description of how these work, if you're interested in learning more.
At its most stripped down, the bike looked like this:

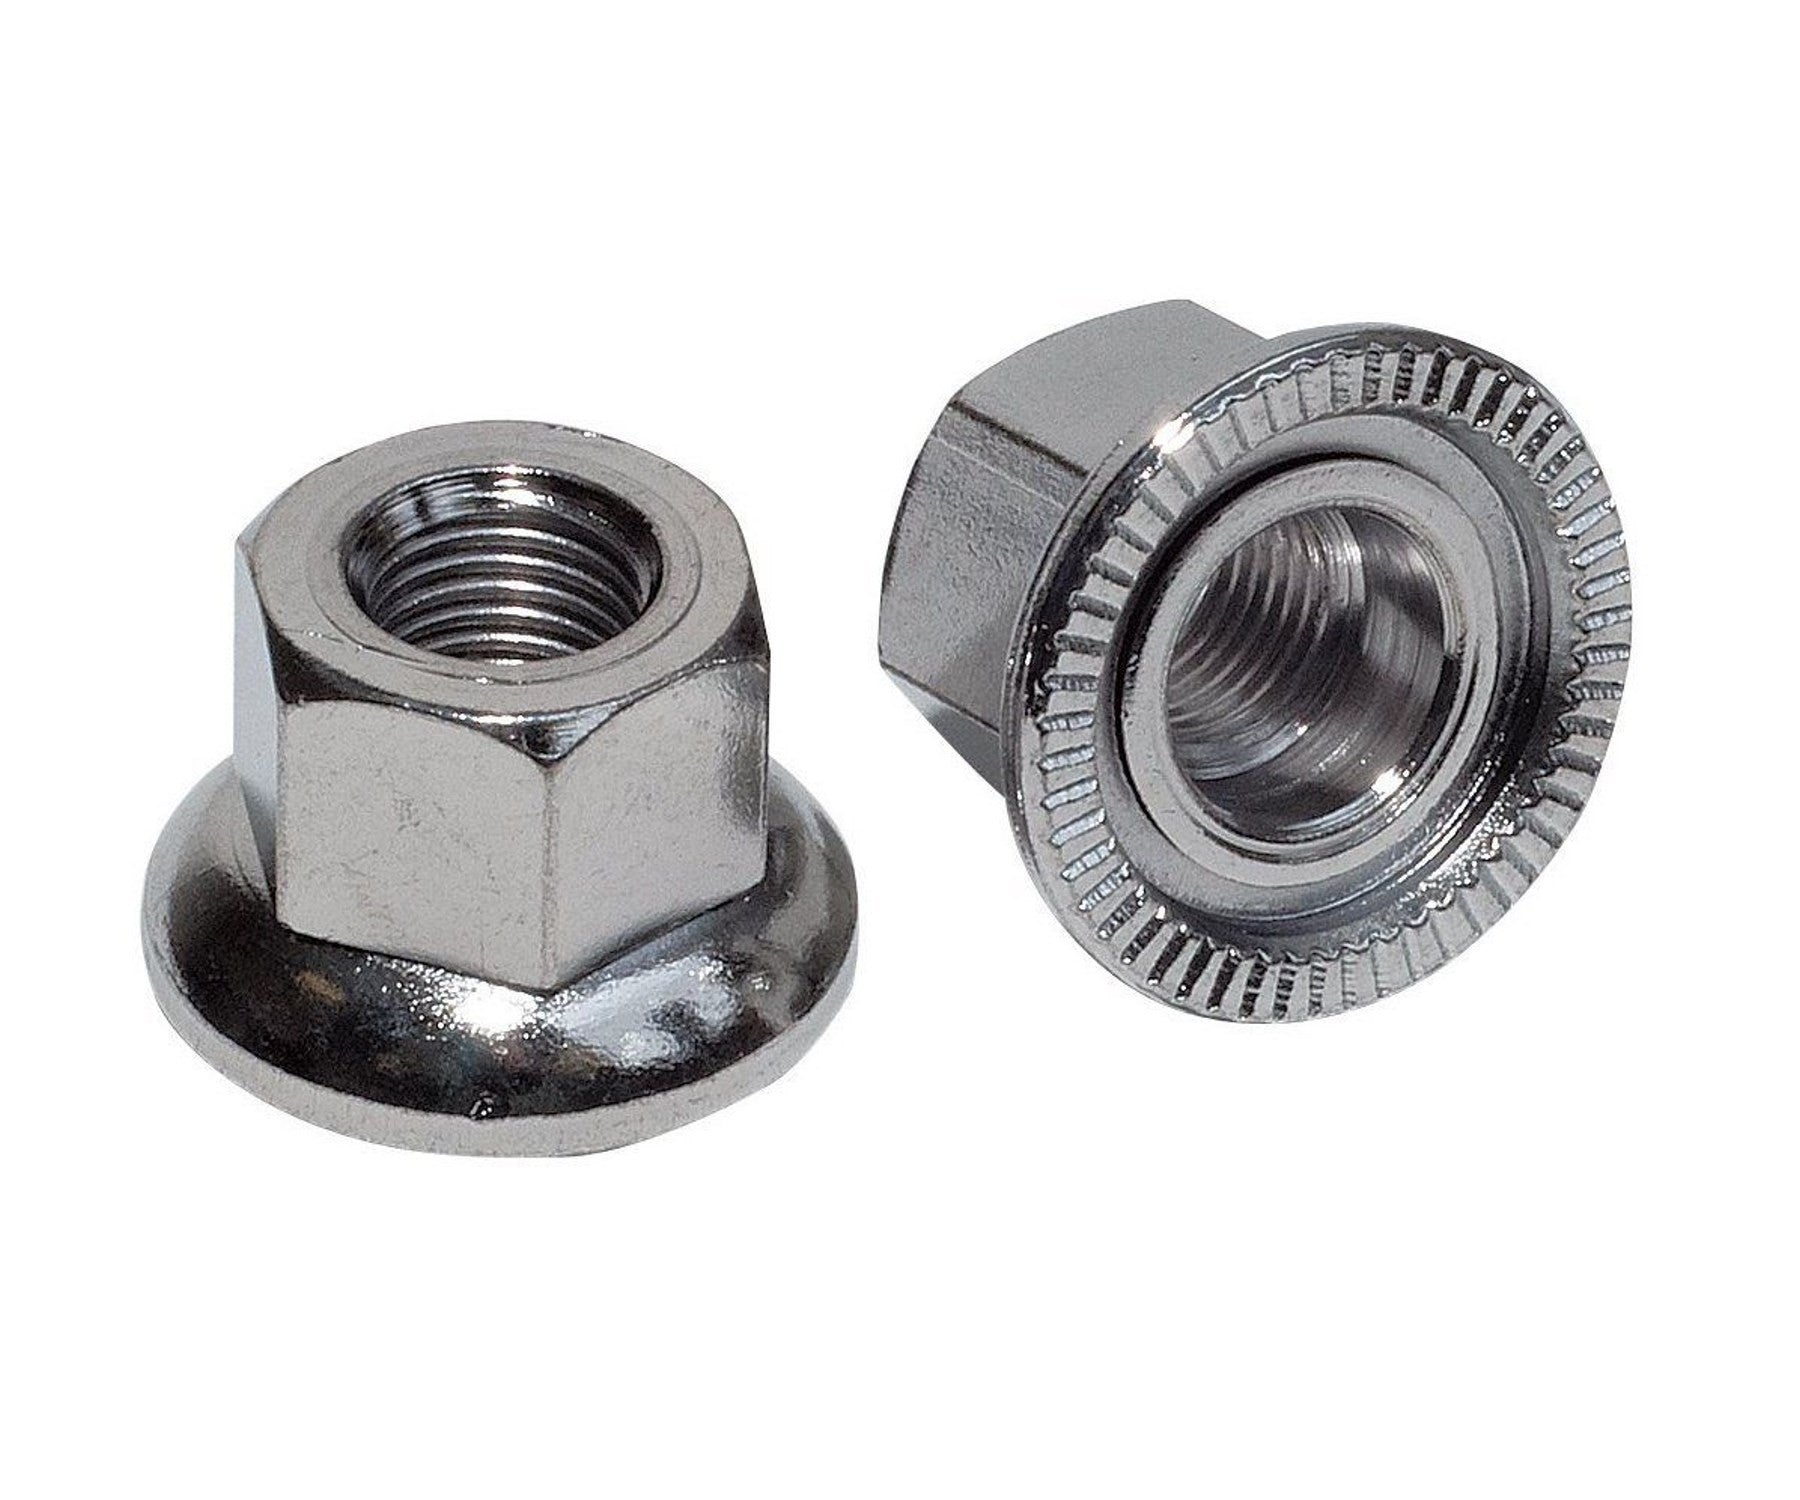
There was one other serious SNAFU I encountered. The frame I have is a track frame, with horizontal rear fork ends. Normally track bikes have axle nuts with teeth, which grip into the fork ends when tightened. This is necessary to keep the rear wheel in place under extreme loads. If you're applying a lot of force (e.g. while climbing, or quickly accelerating), the force applied on the chain is significant---if you're out of the saddle, it's at least equal to your body weight. Without teeth gripping the frame, it's not possible to tighten the axle nuts sufficiently to withstand that kind of force.
At some earlier point in the project I had taken off the axle nuts and washers. In order to accommodate old non-standard frames that no one actually uses, the SRAM Automatix kit comes with an extra long axle through the rear hub, and a bunch of extra washers to make up the difference. Among these washers are special anti-rotation washers. The teeth that are meant to grip the fork ends are on the anti-rotation washers, not on the axle nuts. Predictably, I installed the washers in the wrong order. About 50 feet into my test ride, the rear wheel slid forward, causing the chain to fall off. Fixing this is "just" a matter of taking the axle nuts and washers off, and reinstalling them in the right order. It's kind of hard to explain this in writing, but this is easier said than done. Normally when riding the rear axle is fixed, and the gears in the hub rotate around it. When I tried to remove the axle nuts, instead the hub would stay fixed and the rear axle would rotate. Since the washers are fixed to the rear axle, this caused the washers to grind against the fork ends, taking off a lot of paint. It took me ten or so very frustrating minutes to actually get the axle nuts loose. I'm including below a picture of how the rear of the bike is supposed to look when the rear wheel is properly installed, in case anyone else is confused by this. Note especially how the washer immediately outside of the fork end (the anti-rotation washer) has teeth pointing inwards, towards the frame.

Future Steps
There are a few other minor changes I want to make to this bike. Currently I have one brake lever, a right hand lever which controls the front brake. This is nonstandard: normally the right brake lever controls the rear brake, and the left brake lever controls the front brake. The placement isn't so important on a bike with only one brake lever, but when I switch to road bikes with two levers I'll sometimes get thrown off. I just ordered a new left hand lever, which I hope to install later this week.
The final change I'm dreaming of is patently ridiculous: I'd like to replace the existing [threadless stem](https://en.wikipedia.org/wiki/Stem_(bicycle_part)#Threadless_stems) with a [quill stem](https://en.wikipedia.org/wiki/Stem_(bicycle_part)#Quill_stems). Quill stems are old fashioned, and difficult to adjust, but I think they absolutely beautiful. They also give bikes a much more classic look, which is something I'm really into. Park Tools has a special cutting die designed for threading fork columns. In principle, it should be possible to use a tap to thread the steerer tube on the bike frame. I couldn't find any cases of people successfully making this change to a frame, although I did find plenty of online forum posts from other people interested in doing this. I think it's possible to do in principle, if you're willing accept a slightly weaker frame (which should be fine on a commuter). I signed up for some introductory metal working classes from TechShop; in the future, once I get some actual machining experience under my belt, this is something I'll ask an experienced machinist about.